Category: Technology

Debugging responsive websites

For the last few weeks I have been working on the redesign of a website and integrating it into a new CMS. It was also the first web project I’ve worked on that was designed to work on mobiles from the get go.

Although I keep abreast of the latest developments via blogs, podcasts and conferences, a real responsive website had yet “to cross my desk” so to speak.

One of the biggest challenges I found on this project was tweaking the design of the site on a mobile device. Inevitably design choices that were made for a desktop site bled into the mobile one and needed to be tweaked.

Tooling for this has come a long way over the last couple of years, with built in developer tools in major browsers like Safari and Chrome, device emulators for iOS and Android, and even complete testing suites in the cloud.

Responsive Preview

A handy tool to get the ball rolling was the responsive preview function that was built in to the CMS. Umbraco 7.2, a minty fresh version of the popular open source .NET Content Management Server, has a handy preview function that allows the editor to preview their page on different devices by changing the viewport.

https://player.vimeo.com/video/113603024

It’s a really handy tool to get a quick impression of how the design will look on differently scaled devices. A big bonus of this feature is that content editors can see for themselves how their content would look and feel on different devices. It was also instrumental in getting them out of the habit of adding manual <br/>s in their content to make it look “just right” on their own machines.

Chrome Device Mode

Debugging content was one thing, but actually getting into the HTML and CSS was another matter. For that I turned to the great Device Mode tools built into into recent versions of Google Chrome. These tools up the ante and don’t just manipulate the viewport but also allow you to use the document inspector to evaluate CSS and JavaScript and see how your website is affected by your code.

Device Mode in action

Device Mode in action

Other handy features include network throttling (for emulating 2G and 3G mobile phone speeds) and manipulating geolocation data for location-aware HTML5 apps.

As handy as these tools are, they still render your web app using the internal web engine of Chrome on the desktop.

On the occasion that your website has a bug that only shows up on say on iPhone and not in the Device Mode emulator you’ll have to look further afield. Both Google and Apple have hooks into their devices so that you can debug them remotely.

Chrome has the ability to connect to Android devices through a USB cable while the Apple solution allows you to remotely connect to on iOS device if is on the same network and you connect to it from a workstation running MacOS X.

Platform agnostic debugging with Weinre

That’s all well if you have a full Device Lab at your disposal but I only had my personal iPhone and iPad and a PC running Windows.

When you listen to as many podcasts as I do, there always a topic that comes up where you think “that’s cool, I could use that some time”. Similarly I once heard about debugging websites remotely but it must have been a while back as I can’t remember where I heard it, so no attributions I’m afraid.

One of the remote debugging tools that stood out was due to it’s curious name, Weinre. It’s pronounced “winery” or “wien-RE” depending on your lovely choice of accent. It is actually an acronym for WEb INspector REmote, but who has time for long names? We in IT love acronyms, don’t we?

One of the biggest advantages of the Weinre set-up is that it is truly platform agnostic. It uses the power of JavaScript to parse the DOM on the device and sends the data back to a server that displays the results in a friendly interface very similar to the desktop web inspectors we know and love.

To set it all up you need the following:

  1. A workstation running Node.js (a server-side JavaScript environment)
  2. Weinre installed on top of Node.js
  3. A running Weinre server on your workstation
  4. A JavaScript include in your web app that points to your Weinre server
  5. Use the remote inspector

Although the setup is similar for most platforms, I will describe here how I got my set-up working.

1. Installing Node.js

As Weinre requires Node.js to run, the first step involves getting Node.js setup on your machine.

Head on over to the Node.js website and download the installer for your environment.
In my case I downloaded the Windows Installer 64 bit version.

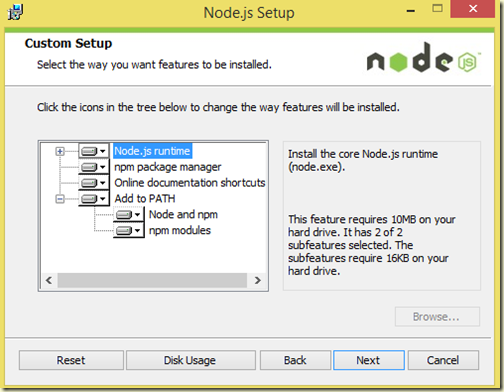
Setting up Node.js correctly

Setting up Node.js correctly

Make sure that you include the npm package manager and Add to PATH options as you’ll need those for the next steps.
To check if Node.js installed correctly, open a new instance of the Windows Command Prompt and type

node –v

You should get back the version of the environment you just installed.

As a final step you should also check if the package manager is up and running. For that you should type in the command

npm –v

Checking that Node.js installed correctly

Checking that Node.js installed correctly

2. Installing Weinre

After you have successfully installed Node.js on your machine you can then use the package manager to install Weinre.

Again from the command prompt, run the command npm command to install Weinre:

npm –g Weinre

Installing Weinre via npm

Installing Weinre via npm

3. Running Weinre

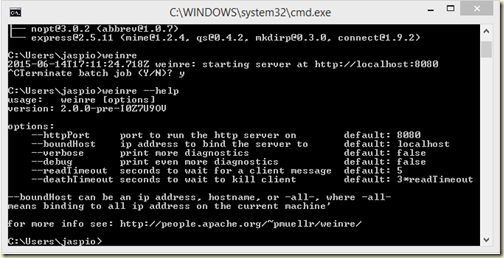
After NPM has finished installing Weinre you should be able to run it using the command

weinre –boundHost –all-

The boundHost flag allows other machines in your network to connect to your server. Without it you would be unable to connect using 127.0.0.1 loopback.

In case you need to set it up using a different port you can use the command

weinre –help

to find the correct flags.

Running Weinre from the command line

Running Weinre from the command line

note: you can stop Weinre by calling terminate command using

Ctrl+C

4. Connecting clients to the Weinre server

The final step of setting up Weinre is to inject a piece of JavaScript that points your clients to your Weinre server. The easiest way to do this is to point your browser to http://localhost:8080 and follow the instructions on screen.

You can either choose to inject the needed JavaScript via a bookmarklet or, my preferred method, is to add the target script to the header of your application:

Example of a target script to add to your web app

Example of a target script to add to your web app

Note that if you want to connect your devices you will need to change the address from localhost to something your clients can reach. Either use a DNS name or the IP address of your server, in my case I used dotsero.local to connect to my server named Dotsero (I name all my devices after volcanoes).

After you have added the target script to you can go ahead and connect your client(s). On your device, pull up the web app you want to to debug. As it loads it will also pick up the extra JavaScript and connect to your server.

5. Using the remote inspector

With your client connected, you should now be able to use the Remote Inspector.

From your server, open up a new browser tab and point it to http://localhost:8080/client/#anonymous. This is the dashboard from which you can select the connected client you wish to inspect.

Connecting to Weinre dashboard

Connecting to Weinre dashboard

When your clients are connected, you should see them popup in the Targets list.
(I won’t paste it here as I don’t want to publish my iPhone’s MAC address).

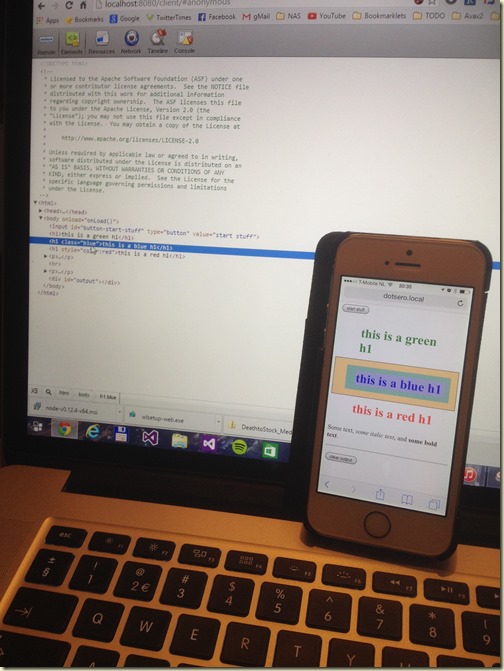
Eh voilà: you should be able to remotely inspect the website on your mobile!
Inspecting HTML on my iPhone

Inspecting HTML on my iPhone


DRM, ebooks and the iPad

A little while ago I got involved in a discussion on Digital Rights Management (DRM) and the iPad on Twitter. @MacMK had recently bought a digital book at Bol.com, and complained that she was given no warning that this would not work on her shiny new iPad.

Young girl balancing a book and an apple on head

Most eBooks are sold in PDF or ePub format and are commonly protected with Adobe’s Digital Experience Protection Technology (ADEPT) DRM scheme. Although there are quite a few ebook readers that support this format, Apple products are one of the few that don’t. This is because Apple sells ebooks through its own iBook Store, protecting the files with their own proprietary FairPlay DRM scheme. As a result, the standard iBooks app on Apple’s iOS (iPad, iPhone, iPod Touch) only read unprotected and FairPlay-protected ebooks. This is also the case of the very popular Stanza app.

Continue reading

Holux M-1000 and my Nokia E65 phone now play nice

Back in December, I bought myself a little present in the form of a GPS receiver.
I wanted to get it as it could work well with my then spanking new Nokia E65 phone.

After scouring the GPS websites, of which there hundreds, I eventfully decided on getting the Holux M-1000. This little gem was an absolute killer: more accurate, longer battery life and a smaller form factor than anything else available in regular Dutch high street shops.

So I got me one those little monsters from my local MediaMarkt and tried to get it to work. Sadly, the results were abysmal and most of the time I couldn’t even get a signal. Or so my phone said.

Well today I took the time do a thorough scanning of the internet. It turns out that both apps I used (Nokia Maps, Google Maps for Mobile) rely on the underlying Symbian 6 3rd Edition to connect with GPS devices. For some reason, Nokia’s version of Symbian seems to screw around with the Bluetooth connection and fails to maintain it.

To my relief there seems to be a reliable work-around for this. The work-around involves removing the Holux M-1000 registration in the paired devices list within the phone. You need to do this every time before you start a GPS-enabled application. It’s irritating to have to do, but so rewarding when you see the thing connect with 12(!) satellites within 2 seconds flat.

Now my GPS receiver works like a charm and I’m going to have a great time playing around with it. Yahoo!

Thanks to the great comments from dayoka on the Nokia forum.

More Transformers: Big Fucking Guns!

Yesterday I went to town with WoollyMittens.

He bought himself a big-ass new LCD monitor, an Apple 23" inch screen.
It was truely gorgeous: not just the styling (which is often damn sexy at Apple) but the picture was amazingly bright and full of colour.

Since we were in The Hague anyway we also went to see a few stores where they sold Transformers.

I ended up buying two new ones:

Binaltech Overdrive and 2007 Movie Deluxe Ironhide.

Binaltech Overdrive and Movie Deluxe Ironhide

Both are somewhat unusual as they both have huge guns.

Overdrive has a huge cannon which folds into the engine cover, raditor and drive shaft for the car mode.

Overdrive's huge cannon

Irondhide, on the other hand has a large energy canon and an even larger rocket launcher: serious armaments!

Ironhide's Big Fucking Guns!

By now i have to admit I’m addicted to collecting this stuff, but when this stuff is so good; how can i resist? ;P

WhatTheFont

Everyone that uses a computer to generate content (a word processor, design in Photoshop) has at some point run into a situation where one needs to emulate a font. Only problem is that you don’t know the name of the exact font or a font that is similar.

This is where WhatTheFont? comes in. It is an application that helps you identify a particular font.

WhatTheFont

You first upload or link an image for it to examine.
Next, the OCR needs some help. And voilà, you’ve found your font.

As this the recognition is actually quite good, you can skip the browsing through entire catalogues of fonts.

A real time saver!

Spelling Checker in Firefox 2.0

Spelling checkers used to be somewhat of a chore on the net.

For a long time, I used to prepare my texts in a real word processor before pasting them in a browser. Then came the add-ons and extensions that added the functionality to the browser. Sadly, many of these efforts failed because the dictionaries were so limited that the effect of these tools was minimal.

Thanks to the massive open-source team now involved in developing Firefox and the Mozilla family, there are now good dependable dictionaries that are directly usable in any web form you want!

As a fan of Firefox I’ve been giving the spelling a go and I can positively say that it really works well. It’s really helped me reduce the amount of typo’s I make. And that is a great thing. But how does it work?

Let Jaspio show you:

When you install Firefox, the corresponding dictionary is embedded into your browser. As I installed the En-US version of Firefox, I have this dictionary as well.

Although American English is fine for most people, I was educated in real English and so I wanted to be able to use the En-GB dictionary. You can do this by downloading the En-GB dictionary from the Firefox Add-on library. (You’ll have to restart Firefox to be able to use the new dictionary).

Next, when you are using a web form with a multi line input you can tell Firefox that you would like to use the built-in spelling checker by right-clicking on the field and checking "Spell check this field".

Activate Spell Check for the form field

The next time you right-click on the field you will see the languages you have installed and from which you can choose.

Select the desired dictionary

After enabling the language of your choice, the spell checker kicks in and uses a thin red underline to show you which words are incorrectly spelled. When you right-click on such a word, you will be presented with a few alternatives.

The spell checker in action

I hope this has been helpful to you!

Your feedback is always appreciated.

How to Block IE 7 from Auto-Installing

Supporting many legacy web applications and systems can be a pain if you are suddenly forced to install a complete new browser platform.

As of October 2006, Microsoft is pushing the installation of Internet Explorer version 7 as a critical update. This means that it will push through most people’s Windows Update settings.

Although the user still has to accept the installation of IE7 per se, it’s still annoying to have the setup popup on your screen when you are not really interested in it.

How to prevent the update package from being installed

Its a simple matter of creating and setting a single registry key:

HLM/SOFTWARE/Microsoft/Internet Explorer/Setup/7.0 then add the DWORD value [DoNotAllowIE70] and set it to "1" (true).

Thanks to Amit Agarwal‘s great article on Blocking IE7.

IIS 6.0 – Indentifying application pools

Ever wanted to know which application pool was behind that one w3p.exe process that always clogs up your Windows 2003 server?

Now you can by running a simple IIS script.
On the console, enter the following command:

cscript %systemroot%system32iisapp.vbs

This script wil then print out a list of all the running application pools and their corresponding process ID.

I made a batch file for on my desktop that paused the script so that the popupped window doesn’t disappear straight away.

Multiple websites in IIS 5.1 (Windows XP)

IIS is easy to use for MS development.
Sadly, the most annoying thing about IIS 5.1 is that you are only allowed to run one website.

But wouldn’t it be nice to have multiple setups for different types of websites?

Thanks to the admin scripts in the Inetpub-folder folder of IIS you can!

To be able to add multiple sites we use the adsutil.vbs file.
(the file is located in the folder C:/Inetpub/AdminScripts).

Here’s an overview of its usage:

Show a list of current setups
adsutil.vbs enum w3svc /p

Create a clean setup in a new website (make sure the sitenumber is free!):
adsutil.vbs create_vserv W3SVC/2

Copy an existing setup to a new site (including Virtual Directories!):
adsutil.vbs copy W3SVC/1 W3SVC/2

Delete a setup:
adsutil.vbs delete W3SVC/2

================

You could also use the the free IIsAdmin.NET tool, but this only creates empty sites and can’t copy settings from one site to another.

MacSaber – Take the Force with you…

Just came across this geeky but oh so call app for the new Apple laptops:

MacSaber in action ;P

When you run the aptly named programme "MacSaber", you can use the laptop as a light saber as if you were a Jedi Knight; the software taps into the inbuilt motion sensors in the devices to simulate a light saber with light and sound effects.

Check it out!